The backend engineering team at Nurdsoft is a fan of Go, we use it for almost all of our backend services, its easier to get started even our Frontend engineering team can write Go!. This article is about how we can use Go to automate a browser virtually acting like a real user.
What is Chromedp?
Chromedp is a Go package that provides a simple API to control the Chrome browser. It is a great tool for automating browser tasks and testing web applications. It is built on top of the Chrome DevTools Protocol.
Chromedp originaly built to do web scraping at scale serves as a great alternative to selenium without installing anything extra. Kenneth Shaw’s talk on chromedp: A New Way to Drive the Web - GopherCon SG 2017 really sums up the power of chromedp and what can it do.
Why Chromedp?
Chromedp takes the least amount of effort to setup. If you work with Go or are planning to build a browser driven web scraper, chromedp is the way to go. Although, I wouldn’t recommend testing your applications using chromedp if you are looking to write E2E tests for your wesbites acorss different browsers. Chromedp is tied to Chrome’s DAP so you won’t be able to test your application on Firefox.
Our Use Case
We are automating playing a mini-game called Hungry Mouse 🐭 using Chromedp. The game is simple, you have to move the mouse to eat the cheese. The game is over when the mouse has eaten all the cheese.
We will try to write an automated player who will help the mouse chase the cheese slices 🧀!

Installation
Initialise a go project and install chromedp and other necessary packages using the go get command.
go get -u github.com/chromedp/chromedp
go get -u github.com/chromedp/cdproto
Make sure you have a latest release of Chrome (or Chromium) installed on your system.
Getting Started
Let’s first start with opening the browser and navigating to the game URL.
package main

import (
	"context"
	"fmt"
	"log"
)

func StartAutomation() error {
	opts := append(
		chromedp.DefaultExecAllocatorOptions[:],
		chromedp.DisableGPU,
		chromedp.Flag("headless", false),
		chromedp.Flag("window-size", "1920,1080"),
	)

	allocCtx, cancel := chromedp.NewExecAllocator(context.Background(), opts...)
	defer cancel()

	// also set up a custom logger
	ctx, cancel := chromedp.NewContext(allocCtx)
	defer cancel()

	log.Println("Starting Chrome")
	// ensure that the browser process is started
	if err := chromedp.Run(ctx); err != nil {
		log.Fatal(err)
	}
    return nil
}

func main() {
	err := StartAutomation()
	if err != nil {
		log.Fatal(err)
	}
}
Notice the chromedp.Flag("headless", false) flag, this will open the browser in a non-headless mode. This will help us see the game in action. You can set it to true if you want to run the game in the background without any UI feedback.
Once you run the code, you will see that the log prints Starting Chrome and then the program exits but you don’t see any browser window. This is because the operation was instantenous. Let’s add a delay to the code so that we can see the browser window.
// delay is a helper function that halts the program for a given amount of time
func delay(ctx context.Context, time time.Duration) {
	err := chromedp.Run(ctx, chromedp.Sleep(time))
	if err != nil {
		log.Fatal(err)
	}
}

func StartAutomation() error {
    // ... existing code

    log.Println("Starting Chrome")
    // ensure that the browser process is started
    if err := chromedp.Run(ctx); err != nil {
        log.Fatal(err)
    }
    delay(ctx, 5*time.Second)
    // ... existing code
}
Great! Now you should see the browser window open up. Time to load our game.
	log.Println("Starting Chrome")
	// ensure that the browser process is started
	if err := chromedp.Run(ctx); err != nil {
		log.Fatal(err)
	}

	log.Println("Opening Hungry Mouse")
	url := os.Args[1]

	err := chromedp.Run(ctx, chromedp.Navigate(url))
	if err != nil {
		return err
	}
	delay(ctx, 2*time.Second)
The chromedp.Navigate(url) will navigate to the given URL. We are passing the URL as a command line argument. You can also hardcode the URL if you want. The delay function is used to halt the program so that the game is loaded completely. We are using it so that the we are sure browser loads our page.
However, we could also have used the chromedp.WaitVisible() method to wait for a particular element to be visible on the page.
Playing the Game
So far we have successfully opened the browser and navigated to the game URL. To start the game we have to perform following actions automatically:
- Find the input box and add the amount of cheese we want to eat.
- Find & Click on the
Let me eat!button to start the game. - Find the mouse and start moving it towards the cheese until all the slices are gone. We also have to actively find the update position of both our mouse and the cheese.
There’s a lot to do, so we will break it down and take it step-by-step.
Step 1: Find the input box and add the amount of cheese
	// Find the email input field by CSS selector
	inputSelector := `input#cheese-count`
	err = chromedp.Run(ctx, chromedp.Focus(inputSelector))
	if err != nil {
		return err
	}

	log.Println("Filling in cheese slice count")
	// Fill in the cheese slices input field
	var cheeseCount string = "5"
	err = chromedp.Run(ctx, chromedp.SendKeys(inputSelector, cheeseCount))
	if err != nil {
		return err
	}
The chromedp.Focus() method will focus on the input field. The chromedp.SendKeys(inputSelector, cheeseCount) will fill in the input field with the given value. You can find other examples of how to use SendKeys in chromedp examples.
Step 2: Click on the Let me eat! button
	log.Println("Clicking Let me eat button")
	err = chromedp.Run(ctx, chromedp.Click(`#submit-button`))
	if err != nil {
		return err
	}
chromedp.Click() sends a mouse click event to the node matching the selector in our case that’s our submit button. Chromedp also provides a Tasks type which can be used to group multiple actions together in a sequential order. So the following code will also work.
func StartGame(url string) chromedp.Tasks {
	return chromedp.Tasks{
		chromedp.Navigate(url),
		chromedp.Focus("input#cheese-count"),
		chromedp.SendKeys("input#cheese-count", "25"),
		chromedp.Click("#submit-button"),
	}
}

func StartAutomation() error {
	// ... existing code

	c := chromedp.FromContext(ctx)
	tasks := StartGame(url)
	if err := tasks.Do(cdp.WithExecutor(ctx, c.Target)); err != nil {
		return errors.Wrap(err, "could not start game")
	}
	// ... existing code
}
Our next task is to check whether there’s cheese in canvas.
Step 3: Move the mouse towards the cheese 🧀
Since we designed and built the game ourselves, we our aware on how to locate different HTML elements in our game.
func IsCheeseFound(ctx context.Context) (bool, error) {
	// find the cheese by getting it by "cheese-image" id
	var cheeseFound bool = false
	if err := chromedp.Run(ctx,
		chromedp.Evaluate(`(function() {
			const cheese = document.getElementById("cheese-image");
			return cheese !== null;
		})();`, &cheeseFound),
	); err != nil {
		return false, err
	}

	return cheeseFound, nil
}
The chromedp.Evaluate() method evaluates the given JavaScript expression and stores the result in the given variable. In our case, we are checking whether the cheese image is present in the canvas or not.
Next we find our mouse and move it towards the cheese.
func GetMousePosition(ctx context.Context) (float64, float64, error) {
	// Execute JavaScript to get coordinates of image
	var imageInfo map[string]float64

	if err := chromedp.Run(ctx,
		chromedp.Evaluate(`(function() {
			const canvasRect = canvas.getBoundingClientRect();

			var imageCenterX = canvasRect.left + position.x + imgWidth / 2;
			var imageCenterY = canvasRect.top + position.y + imgHeight / 2;

			return { imageCenterX, imageCenterY };
        })();`, &imageInfo),
	); err != nil {
		return 0, 0, err
	}

	x := imageInfo["imageCenterX"]
	y := imageInfo["imageCenterY"]

	return x, y, nil
}
To calculate the position of our mouse, we are using the canvas.getBoundingClientRect() method. This method returns the size of an element and its position relative to the viewport.
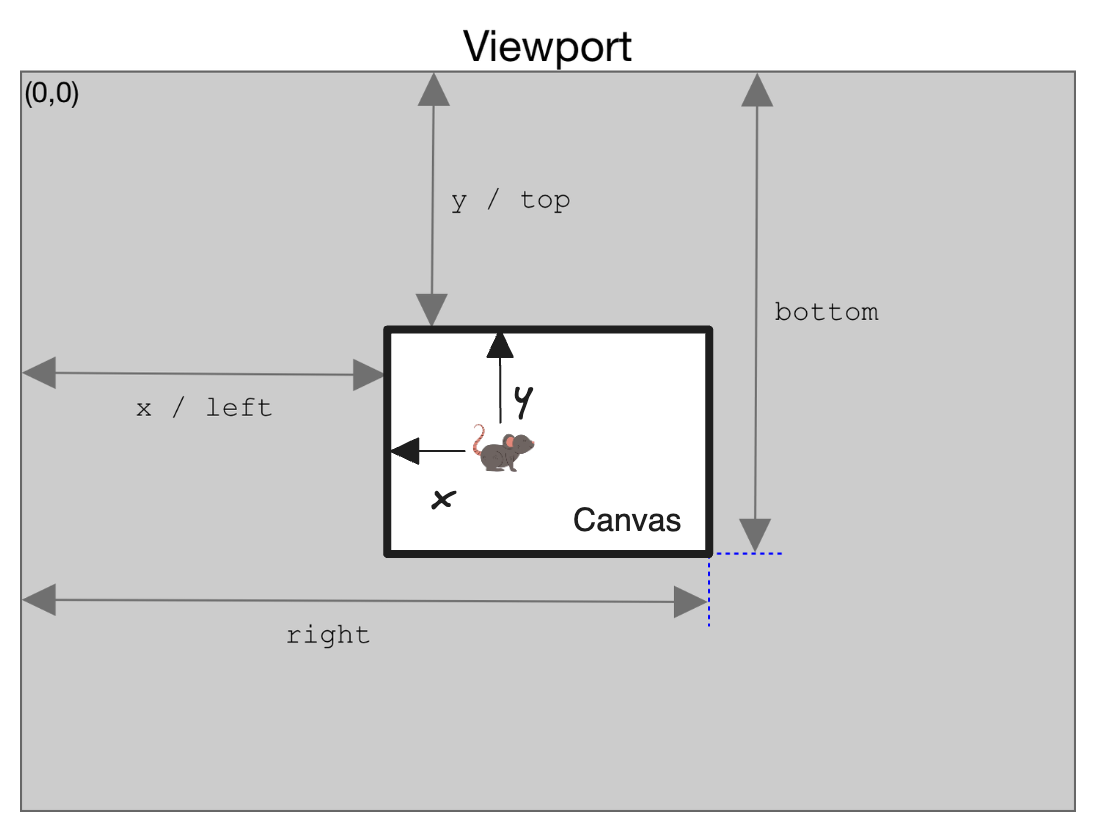
While calculating the position of our mouse, we are making sure we grab the “mouse” image by its center. This is because the mouse image is not a square image, it’s a rectangle and while dragging the mouse we want to drag it from the center of the image as we will see later in the article.
Step 4: Move the mouse towards the cheese
Moving the mouse involves, doing a drag and drop operation. For a user drag operation consists of 3 input actions:
- Mouse pressed
- Mouse moved
- Mouse released
You can find all the 4 available types of mouse events in chromedp documentation.
func DragElement(ctx context.Context, initialX, initialY, finalX, finalY, factor float64) error {
    c := chromedp.FromContext(ctx)
	// first action: mouse pressed
	p := &input.DispatchMouseEventParams{
		Type:       input.MousePressed,
		X:          initialX,
		Y:          initialY,
		Button:     input.Left,
		ClickCount: 1,
	}
	if err := p.Do(cdp.WithExecutor(ctx, c.Target)); err != nil {
		return errors.Wrap(err, "could not do left-click on mouse")
	}

	p.X = finalX
	p.Y = finalY
	steps := int(math.Max(math.Abs(finalX-initialX), math.Abs(finalY-initialY)) / factor)

	// second action: Mouse Move
	p.Type = input.MouseMoved
	for i := 1; i <= steps; i++ {
		p.X = initialX + (finalX-initialX)*float64(i)/float64(steps)
		p.Y = initialY + (finalY-initialY)*float64(i)/float64(steps)

		if err := p.Do(cdp.WithExecutor(ctx, c.Target)); err != nil {
			return errors.Wrap(err, "could not move mouse")
		}

		// Add a delay to make the movement smoother
		time.Sleep(time.Millisecond * 80)
	}

    // third action: Mouse Released
	p.Type = input.MouseReleased
	if err := p.Do(cdp.WithExecutor(ctx, c.Target)); err != nil {
		return errors.Wrap(err, "could not release mouse")
	}

	return nil
}
The DragElement function is used to move the mouse towards the cheese. It takes the initial and final coordinates of the mouse and cheese and moves the mouse towards the cheese.
Putting it all together
	log.Println("Clicking Let me eat button")
	err = chromedp.Run(ctx, chromedp.Click(`#submit-button`))
	if err != nil {
		return err
	}

	// var times int = 10
	var factor float64 = 50

	for {
		cheeseFound, err := IsCheeseFound(ctx)
		if err != nil {
			return err
		}

		if !cheeseFound {
			log.Println("I am full 🐭, no more cheese")
			break
		}

		// Get Mouse Position
		mouseX, mouseY, err := GetMousePosition(ctx)
		if err != nil {
			return err
		}

		// Get Cheese Position
		cheeseX, cheeseY, err := GetCheesePosition(ctx)
		if err != nil {
			return err
		}
		log.Printf("There is cheese at x:%v, y:%v\n", cheeseX, cheeseY)

		// Drag Element
		err = DragElement(ctx, mouseX, mouseY, cheeseX, cheeseY, factor)
		if err != nil {
			return err
		}

		log.Println("There is still cheese 🧀 left")
	}
GetCheesePosition is similar to GetMousePosition function. It uses the same chromedp.Evaluate() method to get the coordinates of the cheese image.
Conclusion
We have successfully automated the game using Chromedp. You can find the complete code on Github.
- We learned how to find elements on viewport.
- Executing JavaScript on the page.
- Adding text to input fields.
- Dragging elements across viewport.
In this article we have only scratched the surface of what chromedp can do. You can use it to automate almost anything that you can do with a browser. You can find more examples on chromedp examples.